Teaching Classic Games of Chess
Introduction
These teaching games are for the lover of great, exciting games of chess. They are constructed as a guide for chess teachers and students at all levels of chess (beyond beginner) to provide short, enjoyable “teaching” games. The mostly tournament games are models of complete play and highlight the abilities of one piece coordinating with other pieces. These models illuminate the mind and provide guiding examples at critical points of a chess player's play.
What I understood a long time ago in my own learning path in chess is that playing through the best games of the great masters stirs a feeling inside which I now identify as a passion for the beauty and excitement of exceptional chess ideas. This is the path to the love of chess. The true chess lover seeks those ideas and absorbs them. Everything else is a quick fix or poor simulation. The mind becomes bored with repetition of technical ideas and poor imitation. However, these great games never fail to awaken the passion for the beauty of chess!
This collection of quality games was a long process of collecting teaching chess games and, initially, just committing them to memory. After years of frustration in constantly looking up most of the games in obscure, old-fashioned chess books and often dealing with old, stilted annotations (if indeed there were any annotations at all at critical points of these games!), I decided the only way to relieve these frustrations was to write my own annotations.
A major feature of this column is that the important ideas and turning points, as well as major tactical and strategic themes, are pointed out and identified both for the teacher and the student. This enables clear identification for further research. Nowhere else in chess literature have I found this clear, listed identification of strategic and tactical themes.
Every game shows the excitement and beauty of a unique conception — a marvellous idea of coordination of pieces brought to fruition in an exciting finish of perfection by the hand of a master. Chess players, at their most enthusiastic, speak of brilliant games they recall and sparkling ideas forever lodged in their subconscious. I hope you will find the game presentations illuminating and enjoyable.
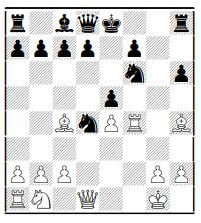
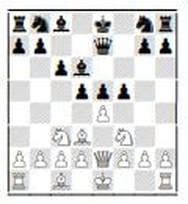
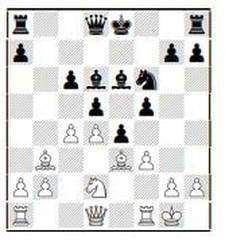
Knight Forks
Introduces the abilities of the knight on the chess board and provides a surprising ending due to careless strategy.
Master – Enthusiast
Russian Simultaneous Exhibit, 1840
This game probably dates from the early 1800's but was a favourite story of ex-world champion Mikhail (Misha) Tal (and he loved to tell chess stories and chess jokes). According to Misha, a chess enthusiast invited a strong master to his village to play the local players. The master would, of course, play all the players at the same time (he might play a minimum of 10 players at a time or as many as 50). This would be considered a challenge for the master and the time needed for the master to get around to all the players would give his opponents ample time to think. This event would be known as a simultaneous chess exhibition (or simul in chess terms). The master would receive the white pieces on every board unless he indicated otherwise. This story revolves around this particular game where the chess enthusiast who invited the master to give the simul actually played him with the black pieces. Story telling is a great way to present a game of chess.
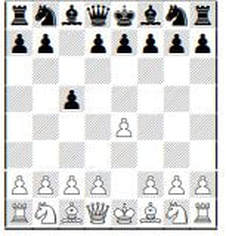
1. e4 e6
The French Defence, one of the most solid defences in chess, is a fitting opening to play against a strong master.
2. d4 d5
Black challenges White's center pawn (threatening d5 captures e4).
3. Nc3
White guards the pawn on e4 with his knight, developing with control of central squares.
3... dxe4
Black captures the e4-pawn with his d5-pawn removing one of White's pawns from his pawn center (two or more pawns across in the central area of the chessboard defines a pawn center).
4. Nxe4 Nd7
5. Nf3 Ngf6
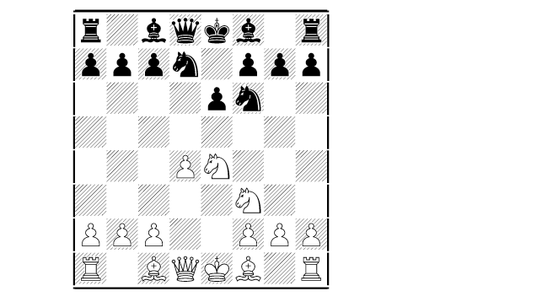
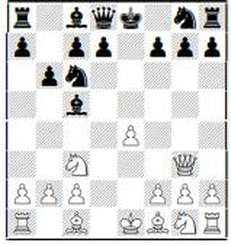
6. Neg5
Black was expecting 6. Bd3, the “normal” move. What is the master up to? Oh well, Black decides to play the solid Be7 preparing to castle the king to safety
6... Be7
The immediate 6... h6 would stop all the white knight's threats (7. Nxf7? Kxf7 and White cannot continue his attack). After the knight retreat 7. Nh3 g5 8. Nhg1 c5 Black has created interesting pawn play.
7. Nxf7
Attacking already.
After playing this move the master went around to all the other games and played. When he came back, poor Black (the chess enthusiast) was sitting with his head in his hands, rocking back and forth, with a look of despair on his face.
“What's the matter? ” the master asked.
“Well, if I play Kxf7 (king captures knight on f7) then you play 8. Ng5+ (knight to g5 check, + means check), if I then reply Kg6 then you play 9. Bd3+, I reply Kh6 and 10. Nf7+ is double check — checkmate! If (going back to move 8) I play the king to any other square you have 9. Nxe6 attacking my queen and I have no good moves. ”
“Yes it looks very bad, ” the master said. “I'll tell you what I will do. I will take your position and play Black and you play my position. We will just turn the board around. ”
7... Kxf7
8. Ng5+ Kg8
9. Nxe6
The chess enthusiast played this move eagerly, telling all his fellow players that the master had given him a gift — a winning position for White!
9... Qe8
Actually 9... Bb4+ 10. c3 Qe7 is more accurate. In the game 9... Qe8 loses if White finds 10. Bc4 threatening discovered check winning the queen. However such play would mean we would not have our game story continuation.
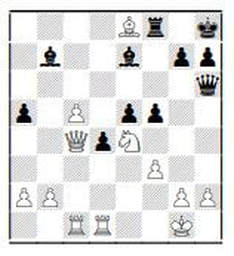
10. Nxc7
“And where do you move your queen? ” the chess enthusiast asks the master (the Black queen is attacked by the White knight). Answer: “I don't have to move it! I have double check — checkmate!”
10... Bb4#
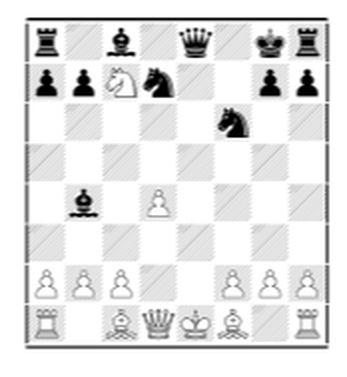
Review of Knight Forks Game
Strategic Themes
The major point of learning in this game is the strategic theme or planning by White. Actually poor planning where White attacks Black's king position before he has looked after his own king safety by castling and the further lesson involved with White's king getting caught in the center with no defence.
Tactical Themes
Black's moves 2 and 3 attacking and capturing a central pawn (also considered strategy or plan). White's move 7. Nxf7 is a knight sacrifice. This opens the king to an attack and allows White’s other knight into Black's position. White's move 9. Nxe6 is a forcing move — Black’s queen must move to e8 to avoid capture and this sets up the following move: 10. Nxc7. This is a knight fork (fork is an attack of two or more pieces by one piece. White’s knight attacks Black’s queen and rook.) Black's move 10. Bb4 is a double check by both bishop and queen. The king is trapped (can't move anywhere) nor can both threats be blocked. It is checkmate and the game is over.
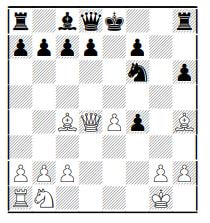
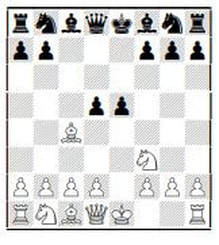
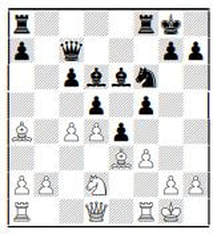
Power of the Pin
[ Ed.: Hans has invented a new word in chess - the "tickler" - which means an irritating pawn move. There was no word in chess to describe that kind of pawn move.]
Rosentreter – Hofer Berlin, Germany, 1899
This game is about the moves and abilities of the bishops, highlighting the power of the pin, and play on the diagonals (also showing the queen in diagonal play). Two obscure masters (Adolph Rosentreter as White and Leopold Hofer as Black) played the game of their lives more than a century ago in Berlin, the capital of Germany. Chess fans the world over have enjoyed this game. What a wonderful teaching game!
1. e4 e5
2. Nf3 Nc6
3. Bc4 Bc5
One of the oldest openings in chess, the Giuoco Piano (Italian for quiet game) aims both bishops at the most vulnerable square in the opposing king position (f7 for Black and f2 for White).
4. O-O Nf6
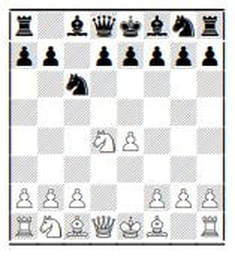
5. d4
This move (pawn to d4) introduces the Max Lange Attack (named after a German attacking player of the 19th century), one of the most exciting opening variations in chess. White sacrifices a center pawn to open the diagonal for his undeveloped bishop on c1.
5... Bxd4
6. Nxd4 Nxd4
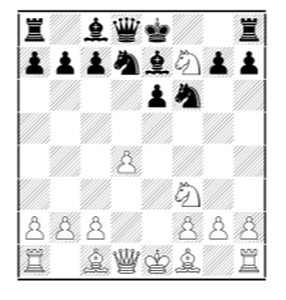
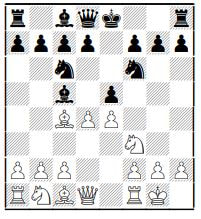
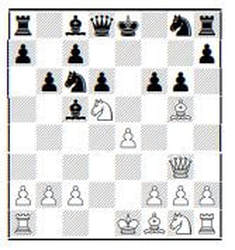
7. Bg5
The pin. White’s bishop on g5 pins Black’s knight on f6 in front of Black’s queen (diagonally). If the knight moves, Black will lose the queen to White’s bishop. Black decides to remove the pin.
7... h6
7... d6 may be safer but gives a space advantage to
8. f4. 8. Bh4 g5
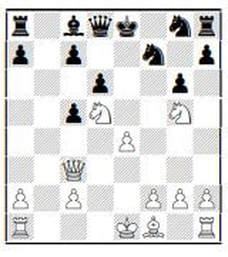
9. f4!!
An amazing move! This move is called a pawn lever. White has visualised three different ideas. One idea is the threat of removing the e5-pawn which is the defender of the knight on d4. Another idea is removing the g5-pawn which blocks the bishop and stops it from pinning. The third idea is bringing the rook on f1 into play (possibly by opening the f-file). So in terms of chess thinking (thinking through Black's choices of moves):
A) If Black’s pawn on g5 captures the bishop on h4 then White’s pawn on f4 captures the pawn on e5 removing the defender of the knight on d4 (the knight is attacked by White’s queen) and also attacking the knight on f6.
B) If Black’s pawn on g5 captures the pawn on f4 then the bishop on h4 pins the knight on f6 to Black’s queen again.
C) If Black’s pawn on e5 captures the pawn on f4 then the knight on d4 will be captured by White’s queen.
D) If Black defends the pawn on e5 (pawn d7 to d6 or knight d4 to c6 or queen to e7) then White’s pawn on f4 will capture the pawn on g5 opening the f-file for the rook.
9... gxf4
If 9... d5! — a pawn lever counterattack in the center (and a tickler!) — the only defence that has a chance, 10. exd5 Bg4! (Black has to counterattack) 11. Qe1 Nd7 (if 11... Nxc2 12. Qxe5+ Qe7 13. Qxe7+ Kxe7 14. fxg5 and White's attack continues) 12. fxg5 hxg5 13. Bf2 Nxc2 14. Qe4 Nxa1 15. Qxg4 Qe7 (if 15... Nc2 16. Qf5 and if Black saves the knight at c2 then the king is lost) 16. Na3 O-O-O 17. Bxa7 Black ends up with a rook for two bishops but White will continue to build threats against Black's weakened position.
10. Rxf4!!
Another amazing move! This rook sacrifice allows more pressure on the pin of the knight on f6 (the bishop on h4 pins the knight on f6 to Black’s queen). White sees that if pawn on e5 captures rook on f4 then either pawn push e4 to e5 will support the bishop capture on f6, or the other choice of queen captures knight on d4 which also supports the bishop capture of the knight on f6.
10... exf4
Black doesn't have much of a choice of moves. The rook also supports the bishop capture of the knight on f6.
11. Qxd4
Much more active than moving the pawn e4 to e5 (and also capturing the knight on d4).
11... O-O
This move is an example of chess humour. Black moves to save the queen and rook knowing that his king will probably get trapped. Better is 11...c5 12. Qe5+ Qe7 13. Bxf6 Qxe5 14. Bxe5 Rg8 15. Bxf4 and White has the advantage of two bishops and better pawn structure for a rook.
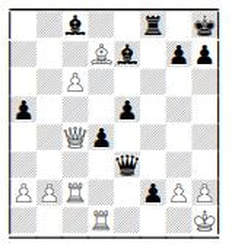
12. Bxf6 Qe8
13. Bh8
White threatens checkmate with the queen on g7. Black would like to play the f7-pawn to f6 to block the checkmate threat but that pawn can't move because White’s bishop on c4 pins the f7-pawn to the king. Black resigns. A stunning finish to a remarkable game!
1-0
Review : Power of the Pin
Strategic Themes
The pin of the bishop on the knight on f6. The pin of the bishop on the f7- pawn. Bringing attackers on to the pinned knight on f6. Using pawn levers (the pawn f2 to f4, also the pawn on d2 to d4 on move 5 was a pawn lever opening the center).
Tactical Themes
Move 5. d4 a pawn sacrifice to open the center and allow the Bc1 to come quickly into play.
Move 6. Nxd4 capturing the active bishop (also preventing the bishop from capturing on b2 winning the rook if the bishop on c1 moves).
Move 7. Bg5 setting up a pin. Move 7 for Black h6 removing the pinning bishop.
Move 8 for Black blocking the pinning bishop.
Move 9. f4 a pawn sacrifice. Move 9 for Black gxf4 capturing a threatening pawn but opening the pin again.
Move 10. Rxf4 a rook sacrifice which allows more support (by the queen) of the pinned knight on f6. Move 10 for Black exf4 capturing the attacking rook.
Move 11. Qxd4 capturing the knight on d4 and additional attack of the pinned knight on f6.
Move 12. Bxf6 capturing the knight and threatening the queen.
Move 13. Bh8 setting up checkmate on g7.
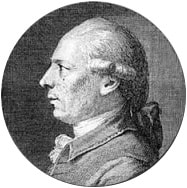
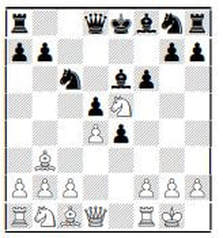
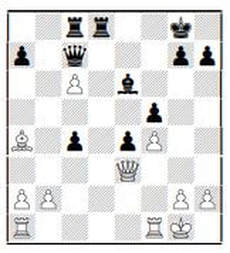
Philidor’s Passed Pawn Endgame
Philidor Portrait from L’analyze des échecs. London, second edition, 1777.
Sheldon – Philidor
London, England, 1788
Francois Philidor's famous saying is "Pawns are the soul of chess." He was a court musician during the
reign of Louis(s), the kings of France. He was the strongest player of his time (from 1750 to almost 1800).
He wrote down the rules and principles of pawn play. In this game he starts building a pawn center right
away and the play of the pieces revolves around control of the center.
1. e4 e5
2. Bc4 c6
3. Nf3 d5
4. exd5
4. Bd3? The bishop is poorly placed on d3.
4... Bd6 5. Qe2 Qe7 6. Nc3 f5!
and Black will win a piece with the pawn fork on e4.
4... cxd5
4... cxd5
5. Bb3
5. Bb5+ does not win a pawn. 5... Bd7 6. Nc3 d4 7. Bxd7+ Nxd7 and White gains nothing.
5... Nc6
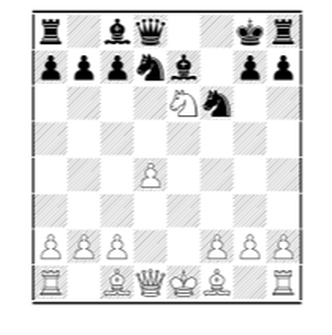
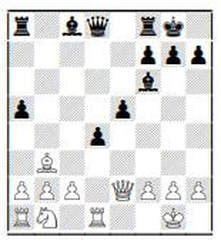
6. d4
White immediately counterattacks with a pawn lever in the center (pawn d2 to d4) to get a share of the
center and also to fix Black’s pawns on d5 and e4 so that he can later attack Black’s center pawns with the
pawn levers c4 and f3 (as happens in the game).
6... e4
Note that 6... exd4?? would be a bad positional mistake. Black should keep the center pawns on the board
and together. 7. Nxd4 White has an isolated (by itself without other pawn protection) d5-pawn target.
7. Ne5 Be6
8. O-O f6!
5. Bb5+ does not win a pawn. 5... Bd7 6. Nc3 d4 7. Bxd7+ Nxd7 and White gains nothing.
5... Nc6
6. d4
White immediately counterattacks with a pawn lever in the center (pawn d2 to d4) to get a share of the
center and also to fix Black’s pawns on d5 and e4 so that he can later attack Black’s center pawns with the
pawn levers c4 and f3 (as happens in the game).
6... e4
Note that 6... exd4?? would be a bad positional mistake. Black should keep the center pawns on the board
and together. 7. Nxd4 White has an isolated (by itself without other pawn protection) d5-pawn target.
7. Ne5 Be6
8. O-O f6!
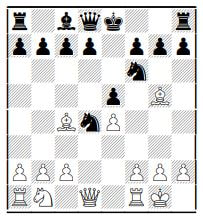
The tickler! (an irritating pawn attack of a piece — in this case the knight on e5) Daring pawn play! Black
forces the knight on e5 to capture c6 strengthening his central pawn structure.
9. Nxc6
If 9. Qh5+?? g6 10. Nxg6 Bf7 A handy defensive pin! 11. Bxd5 Bxg6 12. Bxc6+ bxc6 13. Qd1 creates a
mess in Black's position but Black has an extra bishop.
9....bxc6
Forming a central pawn chain (c6–d5–e4).
10. f3!
A pawn lever attacking the central pawn chain right away.
10... f5
11. Be3
11. fxe4 fxe4 12. Qh5+ Kd7! and Black is better because of the protected passed pawn on e4. 12... g6?? 13.
Qe5 Qd7 threatening Bg7 (14. Qxh8?? Bg7 15. Qxh7 Bxd4+ 16. Kh1 Qxh7 winning the queen.) 14. Rxf8+!
takes away the trapping bishop! Kxf8 15. Qxh8 and White is up a bishop.
11... Nf6
12. Nd2 Bd6
13. c4
A third pawn lever attacking the central pawn structure. The central tension is almost at a maximum.
13... O-O
Developing is better than winning a piece with 13... f4 which opens up Black's king to counterplay 14. cxd5
cxd5 15. Nxe4 fxe3 16. Ba4+.
14. Ba4 Qc7!
13... O-O
Developing is better than winning a piece with 13... f4 which opens up Black's king to counterplay 14. cxd5
cxd5 15. Nxe4 fxe3 16. Ba4+.
14. Ba4 Qc7!
Defence and counterattack aimed at h2.
15. f4
Allows the knight on f6 to attack but what else can White play?
A) 15. g3? Bxg3 16. hxg3 Qxg3+ 17. Kh1 f4! 18. Bg1 e3! 19. Nb1 Qh3+ 20. Bh2 Nh5 21. Kg1 Rf5
threatening Rg5+ is mating White
.
B) 15. h3 Bh2+ 16. Kf2 (16. Kh1 Nh5) 16... f4! is also horrible.
15... Ng4
16. Qe2 Nxe3
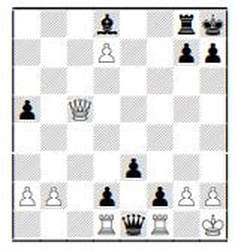
17. Qxe3 c5!!

Excellent strategy and pawn play based on tactical threats! Black is ready to change his pawn chain into
connected passed pawns!
18. Nb3
A) 18. dxc5?? Bxc5 pins queen to king.
B) 18. cxd5?? cxd4! creates connected passed pawns 19. Qxd4?? Bc5 20. Rac1 Bxd4+ wins White’s queen
with check.
18... dxc4
18... cxd4 was also playable but unnecessarily gives White tactical possibilities.
19. Nxc5 Bxc5
20. dxc5 Rac8
21. c6 Rfd8
Black's pieces are better placed and he has a protected passed pawn on e4 but how does he keep building
his position?
22. Rfd1 Rd3!
This is how! Use an advanced rook outpost on an open file to help double rooks (by playing Rcd8)
increasing pressure of active pieces. An outpost is pawn support of an active piece and that piece cannot be
attacked by pawns. This allows a piece to “anchor” itself in the opponent's position.
23. Rxd3
23. Qc5 Rcd8 24. Bc2 Rd2!
Allows the rook to occupy the important seventh rank. The seventh rank in the opponent's position is the
best place for rooks because more targets are found on this rank than anywhere else! — for example:
pawns, king position, and even open space to get behind weak pawns.
23... cxd3
Notice how Black keeps finding ways to form connected passed pawns. Connected passed pawns are
doubly stronger than two individual passed pawns because of the opportunity of advancing together and the
pressure they create on the opponent trying to defend.
24. Bb3? Bxb3
This removes an important defender.
25. axb3 Qb6
26. Kf2 Qxe3+?
doubly stronger than two individual passed pawns because of the opportunity of advancing together and the
pressure they create on the opponent trying to defend.
24. Bb3? Bxb3
This removes an important defender.
25. axb3 Qb6
26. Kf2 Qxe3+?
Too rushed. Better was 26... Rxc6 threatening Rc2+ moving White’s king away from defending the queen.
27. Kxe3 Rxc6
28. Rxa7 Rd6
Normal procedure is to put a rook behind a passed pawn to help push it into becoming a queen. But here
White has the defence of 29. Ra1 and Rd1. So 28... Rc2 is more efficient and the rook will capture most of
White's remaining pawns.
29. Kd2
However, White does not find the rook defence so . . .
29... e3+
30. Kxe3?
If 30. Kd1 the accurate 30... g5! is a pawn lever which breaks open White's position. 31. fxg5 (31. g3??
gxf4 32. gxf4 Rg6 will checkmate) Rc6 32. Rd7 (32. Re7 f4) e2+ 33. Kd2 Rc2+ 34. Kxd3 e1=Q 35. Rd8+
Kf7 36. Kxc2 Qe4+ creates a passed f-pawn and a won endgame for Black.
30... d2
31. Ra1 d1=Q
White resigned.
0-1
Review of Philidor Game
Strategic Themes
Setting up a strong center.
Counterattack of the central pawn structure with pawn
levers.
The formation of the pawn chain.
Dynamic pawn play to breakthrough in center.
Removing defenders to setup pawn breakthroughs.
Subvariation of how to attack when White weakens his
kingside pawn structure.
Rook play on the open file.
The seventh rank and how to use it.
Connected passed pawns in the endgame.
Tactical Themes
Move 3... d5 a pawn fork forcing control of the center.
Moves 6. d4, 10. d3, 13. c4, and 17.... c5 are pawn levers
forcing play in the center.
Move 8... f6 the tickler! (an irritating pawn attack of a
minor or major piece).
Notes after 14.... Qc7, attack on the kingside.
Moves 16.... Nxe3, 24.... Bxb3, and 26.... Qxe3+ remove
the defender.
Active rook play.
Move 29... e3+ forcing the passed pawn through.
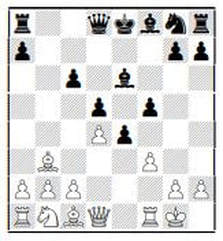
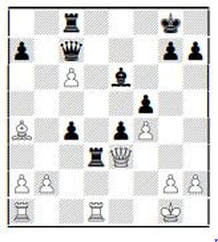
Art of Pawn Promotion
McDonnell – La Bourdonnais
London, England, 1834
Francois Andre Philidor, Guillaume Le Breton Deschappelles, Louis Charles Mahe de La Bourdonnais, and Pierre Charles Fournier De Saint Amant were the four great masters from France who dominated the chessworld for almost 100 years (1750 – 1843). They each played many brilliant games and found amazing tactics but were also great masters of strategy. I consider this game the greatest passed pawn endgame of all time!
1. e4 c5
This move (c5) is the beginning of the most popular opening in chess, the Sicilian Defence. More tournament games of chess start with the Sicilian Defence than any other opening. It is also one of the oldest openings. Chess openings are usually named after countries or regions (Sicilian originated in Sicily, the southernmost region of Italy) or cities or famous players who invented them or played them more often than anyone else. Openings developed first in Italy and Spain, and then later in Great Britain, France, Holland, Germany, Russia, and the rest of Europe. Only much later did the world beyond Europe get credit for opening discoveries.
2. Nf3 Nc6
3. d4
A pawn lever to open the center and which leads to an “Open Sicilian” with lots of piece play.
3... cxd4
4. Nxd4
One reason why this is a popular opening is that the knight is developed before the bishop which is a principle often expounded by the old masters. Old opening books written by the best players over a hundred years ago were inflexible in their belief that beginners must follow this “knights before bishops” developing principle. Notice also that both White and Black have only moved central pawns to develop the pieces (bishops and queens) behind those pawns. The knight on d4 which is attacked by the knight on c6 is guarded by the queen on d1. These are the beginning elements of piece coordination.
4... e5!
The tickler — a pawn move to remove the knight from the center and to start building Black's pawn center. (A tickler is an irritating pawn move attacking a piece and usually forcing it to move to a less advantageous square.)
5. Nxc6?
White is helping Black build his pawn center. After this capture Black’s c6-pawn will support the pawn move d5 and Black will have his pawn center.
5... bxc6
6. Bc4?
More logical would have been pawn to c4 to make it difficult for Black to make his pawn center.
6... Nf6
7. Bg5 Be7
8. Qe2
8. Nc3 is better as it prevents the lever d5 for Black. For example: 8...d5 9. Bxf6 Bxf6 10. exd5 and White wins an important center pawn.
8... d5!
9. Bxf6
9. exd5 cxd510. Bb5+ Bd7 11. Bxd7+ Nxd7 and the center is Black’s.
9... Bxf6
10. Bb3 O-O
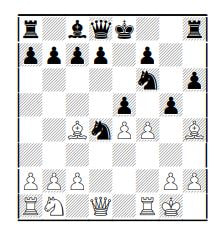
11. O-O a5!
A clever move threatening both to trap the bishop on b3 with pawn a4 (on the next move) and win an exchange with the X-ray attack after bishop to a6. (An X-ray attack is the opposite of a pin. In a pin the lesser piece in front can't move or the greater piece behind will be lost. In an X-ray attack if the greater piece in front moves the lesser one behind will be lost.)
12. exd5 cxd5
13. Rd1 d4
4... e5!
The tickler — a pawn move to remove the knight from the center and to start building Black's pawn center. (A tickler is an irritating pawn move attacking a piece and usually forcing it to move to a less advantageous square.)
5. Nxc6?
White is helping Black build his pawn center. After this capture Black’s c6-pawn will support the pawn move d5 and Black will have his pawn center.
5... bxc6
6. Bc4?
More logical would have been pawn to c4 to make it difficult for Black to make his pawn center.
6... Nf6
7. Bg5 Be7
8. Qe2
8. Nc3 is better as it prevents the lever d5 for Black. For example: 8...d5 9. Bxf6 Bxf6 10. exd5 and White wins an important center pawn.
8... d5!
9. Bxf6
9. exd5 cxd510. Bb5+ Bd7 11. Bxd7+ Nxd7 and the center is Black’s.
9... Bxf6
10. Bb3 O-O
11. O-O a5!
A clever move threatening both to trap the bishop on b3 with pawn a4 (on the next move) and win an exchange with the X-ray attack after bishop to a6. (An X-ray attack is the opposite of a pin. In a pin the lesser piece in front can't move or the greater piece behind will be lost. In an X-ray attack if the greater piece in front moves the lesser one behind will be lost.)
12. exd5 cxd5
13. Rd1 d4
Notice that although Black has “won” the center (which is an advantage), White has pressure on the center and Black needs to develop his pieces before he will have better play.
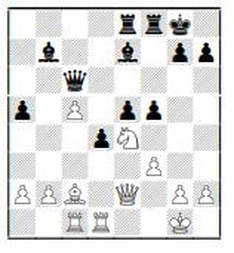
14. c4?
Kasparov considers 14.c4 to be the decisive mistake, but it leads to complications that make the game very exciting and interesting. Although White now gets a passed pawn, Black's connected passed center d-pawn is more of an advantage. As you will see in the game the passed d-pawn is a permanent advantage and Black is well on the way to a winning position. Be careful before you move pawns, they can never move backwards! More solid is 14. Nd2 a4 15. Bc4 a3 16.b3 Bb7. An interesting alternative is 14. Nc3.
14... Qb6
15. Bc2 Bb7
16. Nd2 Rae8!
The f8-rook should stay on the f-file to help the f-pawn lever (as we see played later in the game).
Black does not concern himself with tricks and develops all his pieces! 16... Qxb2? 17. Qd3 g6 18. Rab1 e4 19. Nxe4 Bxe4 20. Rxb2 Bxd3 21. Bxd3 Rfe8 and Black has no advantage.
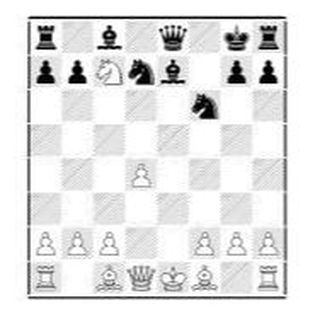
17. Ne4 Bd8
“Saving” the two bishops. The two bishops (opposing a bishop and knight) are a considerable advantage when there is open play on both sides of the board.
18. c5 Qc6
19. f3
Blocking the vulnerable diagonal a8 to h1 (Black was threatening checkmate on g2 if the knight moved), supporting the knight and White is now threatening knight to d6.
19... Be7
20. Rac1 f5!
14. c4?
Kasparov considers 14.c4 to be the decisive mistake, but it leads to complications that make the game very exciting and interesting. Although White now gets a passed pawn, Black's connected passed center d-pawn is more of an advantage. As you will see in the game the passed d-pawn is a permanent advantage and Black is well on the way to a winning position. Be careful before you move pawns, they can never move backwards! More solid is 14. Nd2 a4 15. Bc4 a3 16.b3 Bb7. An interesting alternative is 14. Nc3.
14... Qb6
15. Bc2 Bb7
16. Nd2 Rae8!
The f8-rook should stay on the f-file to help the f-pawn lever (as we see played later in the game).
Black does not concern himself with tricks and develops all his pieces! 16... Qxb2? 17. Qd3 g6 18. Rab1 e4 19. Nxe4 Bxe4 20. Rxb2 Bxd3 21. Bxd3 Rfe8 and Black has no advantage.
17. Ne4 Bd8
“Saving” the two bishops. The two bishops (opposing a bishop and knight) are a considerable advantage when there is open play on both sides of the board.
18. c5 Qc6
19. f3
Blocking the vulnerable diagonal a8 to h1 (Black was threatening checkmate on g2 if the knight moved), supporting the knight and White is now threatening knight to d6.
19... Be7
20. Rac1 f5!
Black starts action in the center with a tickler against the knight.
21. Qc4+ Kh8
22. Ba4
White was attracted to this X-ray attack and now wins the exchange (winning a rook for a bishop or knight). Did Black miss this idea?
The Zwischenzug (intermediate move) 22. Nd6 Bxd6 23. Ba4 Qxc5 24. Qxc5 Bxc5 25. Bxe8 (or 25. Rxc5 Re7 26. Rxa5 Rd8 ) 25...Bd6 26.Bc6 Ba6 and an interesting endgame results where Black eventually will attempt to push the central pawns.
22... Qh6
23. Bxe8
Here the Zwischenzug 23. Nd6 only changes Black's attacking idea: 23. Nxd6 Bxd6 24. Bxe8 Bc7 A) 25. Qb3 Ba6 26. Bb5 Bxb5 27. Qxb5 e4 28. g3 Qe3+ 29. Kh1 Qxf3+ 30. Kg1 Bxg3. B) 25. c6 Bc8 (the mis-timing of the e4 lever leads with best play to a draw!
25...e4?! 26. cxb7 Qxh2+ 27. Kf1 exf3 28. gxf3 Bg3 29. Qxd4 Rxe8 30. Rd3!) 26. Bh5 (26. Bd7 e4 27. Bxc8 d3) Qxh5 27. Qc5 Re8 28. Qa7 Qf7 29. Kh1 Qe7 30. f4 Qd6.
23... fxe4!!
No, Black did not miss the loss of the exchange. He has seen deeper!! The center pawns now start their action!
24. c6 exf3?
An inaccuracy allowing a good defence by the rook. Better is 24... Qe3+ 25. Kh1 (25. Kf1?? exf3 26. g3 e4 27. Re1 Qh6 28. Rxe4 Ba6 29. Qxa6 Qxc1+ mates) exf3 26. Rf1 fxg2+ 27. Kxg2 Qe4+ 28. Kg1 Rxe8 29. cxb7 Qxb7. 25. Rc2 White has a strong passed pawn of his own, but has to be careful!
25. cxb7?? Qe3+
26. Kh1 fxg2+ 27. Kxg2 Rf2+ 28. Kg1 Rc2+ 29. Kh1 Qf3+ 30. Kg1 Qg2 checkmate.22
25... Qe3+
26. Kh1??
A natural move but also a blunder returning the favour. 26. Rf2 should successfully defend. A sample line is: 26... fxg2 27. Qe2 Ba6 (27... Qxe2? 28. Rxe2 Ba6 29. Rxe5 Rf1+ 30. Kxg2 Rxc1 31. Rxe7) 28. Qxe3 dxe3 29. Rxf8+ Bxf8 30. Rc1! e2 31. Bh5 g6 32. Bxe2 Bxe2 33. c7 Ba6 34. c8=Q Bxc8 35. Rxc8 Kg7 36. Kxg2 and White is winning.
26... Bc8
27. Bd7
A) 27. Bh5 f2 28. Qf1 d3 29. Rcd2 e4.
B) 27. Bf7 Bf5 28. Rcd2 (28. Rcc1?? fxg2+ 29. Kxg2 Bh3+ 30. Kh1 Qe4+ 31. Kg2 Qg2#) Bb4.
27... f2
"Passed pawns must be pushed!" (threatening Qe1+), but 27... d3! is actually better 28. Qxd3 Qxd3 29. Rxd3 f2 30. Rxf2 Rxf2 31. g3 Rf8 32. Rd5 Rd8.
28. Rf1
28. Bxc8?? Qe1+ 29. Qf1 Qxd1 30. Qxd1 f1=Q+ 31. Qxf1 Rxf1 checkmate.
Also losing is 28. Qf1 Ba6 29. Rxf2 (29. Qxa6?? Qe1+) Qxf2 (29... Bxf1?? 30. Rxf8+ Bxf8 31.Rxf1 and c7) 30. Qxa6 e4 31. c7 Qc2 32. Bg4 Qxc7 33. Rxd4 Qb6 (remove the defender) 34. Qc4 Qb4 35. g3 Qe1+ 36. Kg2 Rf2+ 37. Kh3 Qg1 38. Qc8+ Bf8 39. Kh4 Qxh2+ 40. Bh3 Rf3 41. Qb8 g5+ 42. Kg4 h5+ 43. Kxg5 Rxg3+ winning the queen or checkmating the king.
28... d3!
29. Rc3
Interesting is 29. Bxc8 dxc2 30. Ba6 Qc5 and White should be able to defend with: 31. Qxc5 Bxc5 32. Bd3 e4! (deflection) 33. Bxc2 e3 34. Bd3 Rc8 35. Rc1 (35. Bb5? Rxc6 36. Bxc6?? e2) Rxc6 36. g3 and the bishops of opposite colour and the soon to be active White king helps White's defensive chances greatly.
29... Bxd7
30. cxd7
30. Rxd3? A) 30... Qe2 31. Rc3 Bg4 32. c7! Qxc4 33. Rxc4 Bc8 (33... Be2? 34. Rxf2!! Rxf2 35. c8=Q+ Rf8 36. Rc1! and White keeps the queen.) 34. Rc2 Bh4 35. h3 (35. g3?? Bb7+) e4 36. g3 Bxg3 37. Kg2 Bh4 38. Rcxf2 Bxf2 39. Rxf2 Rxf2+ 40. Kxf2 Bxh3 and Black’s kingside pawns should be able to promote. B) 30... Be6! remove the defender 31. Qc2 Qc5 32. Rd2 Qb5 33. Rdd1 Bxa2 34. c7 Rc8 35. Rxf2 Bb3 36. Qf5 Rxc7!
30... e4!
31. Qc8 Bd8
31...Rd8 32. Rcc1 d2 33. Rcd1 Qf4 34. Qc3 e3 35. Qc6 (35. Rxd2 Bd6 36. Rxd6 e2) 35...e2 36. Qf3 Bd6 37. Qxf4 Bxf4 38.g3 e1=Q.
32. Qc4
A) 32. Qxd8?? Rxd8 33. Rc8 Qg5 34. Rxf2 Kg8! and the connected passed d- and e-pawns will end the battle when they promote to queens.
B) 32. Qc5 Qxc5 (forced) 33. Rxc5 e3 34. Re5 e2 35. Rxf2 Kg8 36. Re8 e1=Q+ 37. Rxe1 Rxf2 38. Kg1 Rf6.
32... Qe1
33. Rc1
33... d2!
A powerful passed pawn connector (actually a tickler!).
34. Qc5
Answered by a checkmate threat!
34... Rg8
35. Rd1 e3!
Three connected passed pawns ready to queen!
36. Qc3 Qxd1
To set up . . .
37. Rxd1 e2!!
36. Qc3 Qxd1
To set up . . .
37. Rxd1 e2!!
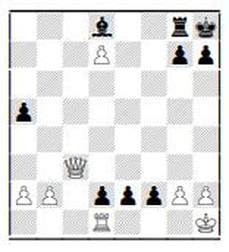
Three beautiful queen candidates standing in a row! White, of course, resigned. This is my favourite endgame of all time! One of the greatest creative and artistic games of all time. The computer evaluation leading to the final position is the highest numerical evaluation of a position that the author has ever seen. It would be a good tactical exercise to input the moves of this game into a strong computer chess analysis program and study the interesting tactical lines the computer program comes up with. Fascinating tactics (and very complicated positions!) throughout this game.
Kasparov says about the final position, "This position, where the small pawns were victorious over the enemy, was so surprising that it seemed like a fairy tale and I was unable to live without chess after seeing it[6 years old]. I have admired this position ever since."
0-1
Review of Art of Pawn Promotion
Strategic Themes
Opening principles in the "Open" Sicilian Defence.
Building the pawn center.
Connected passed pawn in the center.
Saving the two bishops.
How to put passed pawns in motion.
Pushing passed pawns.
Tactical Themes
Moves 3. d4 and 8.... d5 - pawn levers creating play in the center.
Move 4.... e5 the tickler.
Move 11.... a5 rook pawn lever with a double threat.
Move 20.... f5 the tickler.
Move 22. Ba4 winning the exchange.
Moves 23.... fxe4, 24. c6, 24.... exf3 Zwischenzug (intermediate move) also breaking open the king position.
Moves 32... Qe1, 33... d2, 36.... Qxd1, and 37.... e2 setting up and removal of the defender.
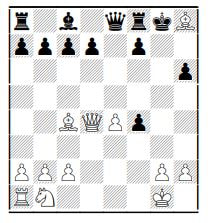
Smothered Knightmare
Van Essen – Duff
California, USA, 1945
This little gem of a game was not played between two famous masters, but by two chess enthusiasts many years ago. No major opening theory, no complexities, no finesses, just beginning tournament play at its best. Threat and threat blocked, move after move, leading to an artistic finish!
One of my favourite simple teaching games! This game is dedicated to the memory of George Koltanowski, the grand old showman, promoter, and blindfold artist of chess! George lived until the age of 96 and conducted several thousand blindfold simultaneous exhibitions during an incredible career of chess promotion that lasted more than 70 years! This game has an amazing Koltanowski-like finish!
1. e4 e5
2. d4
A pawn lever immediately — let’s get the queen out.
2... exd4
3. Qxd4 Nc6
Developing and attacking. Good idea.
4. Qe3 b6
Also developing (Bc8 to b7) but you can almost read Black's thoughts. The best square to attack is f2 and if I can put my bishop (on f8) to c5 with support – I will be attacking the queen and f2 – bonus!
5. Nc3 Bc5
6. Qg3
Counter a threat with a threat (The pawn on g7).
6... g6
The simplest defence.
6... Nf6! 7. Qxg7 (If 7. e5 Qe7; If 7. Bg5 Be7) Rg8 8. Qh6 Bxf2+ 9. Kxf2 Ng4+ forking the king and queen would be seeing a little deeper.
7. Nd5
7... d6?
Two simple defences in a row but this shuts out the bishop on c5 and allows White to take over Black’s squares. Far better was 7... Bd6 answering a threat with a threat.
8. Bg5
Now White is ahead in the game of threats.
8... f6
Ugly, but
A) 8... Qd7 9. Bf6! Nxf6 10. Nxf6+ wins the queen.
B) 8... Nge7 9. Nf6+ Kf8 10. Bh6 checkmate.
9. Qc3
This pin (Qc3 — f6 — Rh8) is also a double attack on f6 and the unprotected knight on c6 (behind the Bc5). White is threatening pawn to b4.
9... Ne5
The only way to block the threat.
A) 9... Bd4?? 10. Qxc6+
B) 9... Nd4 10. b4.
10. b4 fxg5
Black misses a creative defence.
10... Bxf2+ 11. Kxf2 c6.
11. bxc5 bxc5
Black is in grave danger.
Black can’t defend by removing the threatening knight from d5. 11... c6 12. cxd6 Qxd6 13. 0-0-0 cxd5 14. Rxd5 Qf6 15. Rxe5+.
12. Nf3 Nf7
A) If 12... Nxf3+ 13. gxf3 and goodbye rook on h8.
B) The best defence is 12... Nf6 13. Nxe5 Nxd5 14. exd5 dxe5.
13. Nxg5!
Remove the defender of c7 (Qd8) or the defender of Rh8 (Nf7).
13... Ngh6
Knight defends knight defends rook.
14. Bb5+ Bd7?
14... Kf8 was forced. Now White uses the pin on the bishop on d7.
15. Ne6
15... Qc8
16. Qf6 Ng8
Defends the checkmate on e7.
17. Qe7+!!
Most players would play 17. Ndxc7+ Qxc7 18. Nxc7+ Kf8 but White finds a beautiful artistic finish.
17... Nxe7
18. Nf6#
A pretty picture.
1-0
Review of Smothered Knightmare
Strategic Themes
Developing and attacking moves 3... Nc6, 4... b6, 5... Bc5, 8. Bg5, 12. Nf3.
Answering a threat with a threat 6. Qg3 and note 7... Bd6.
Weak black squares around the king move 8 until the end of the game.
Two knights and a queen lead to checkmate move 15 onwards.
Tactical Themes
Central pawn lever opening the game 2. d4.
Pawn lever trapping bishop move 10. b4.
The pin move 9. Qc3 and move 14. Bb5+.
Remove the defender move 13. Nxg5.
Queen sacrifice 17.Qe7+
Smothered checkmate 18. Nf6.
Credit: Erik Malmsten for editing and layout, and Bob Armstrong and Toronto Chess News for publishing.
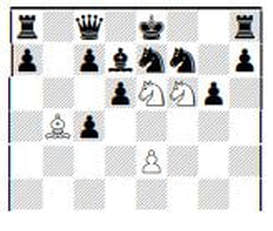
Knight Move Exercise Practicing
If you have never done this before try doing it. It gives fluidity to your knight moves.
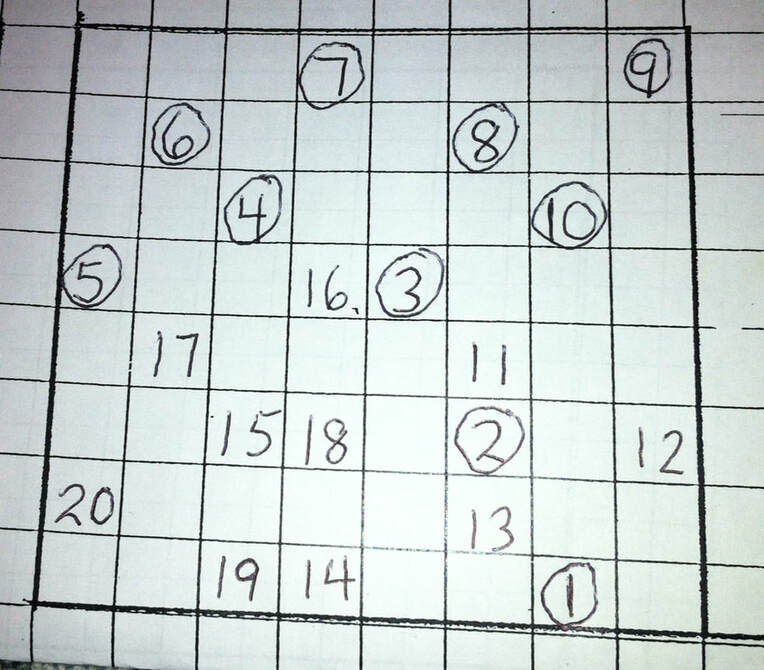
In the picture above there are knight moves across a chess board. Instead of drawing little knights use sequential numbers (one after another) to make knight moves around the chess board. For example above, moves 1-10 have been circled just to make it easier to distinguish them from 11-20. Note at 20 there are no more knight moves because 20 is trapped. So note the only moves from 20 would be to 17, 15, 19 those would be the only legal moves. You cannot repeat moves on a square. In doing this exercise you will eventually become trapped. The following example shows how to do knight moves covering all the surrounding squares.
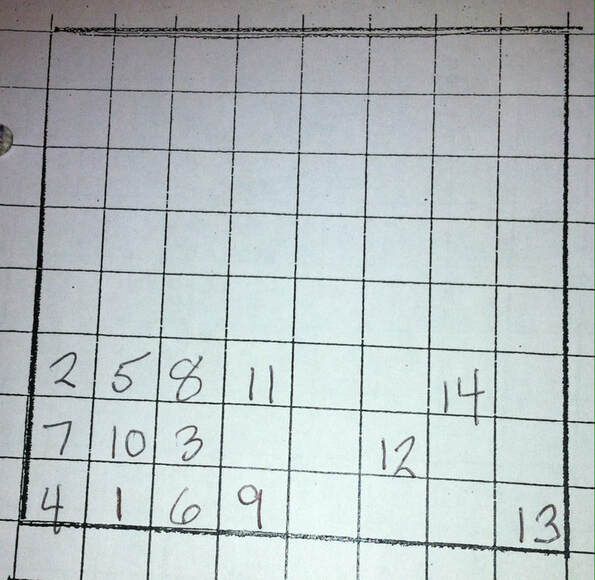
The entire left hand corner has been covered with knight moves. This is just an example of filling more squares and venturing into corners of the board.
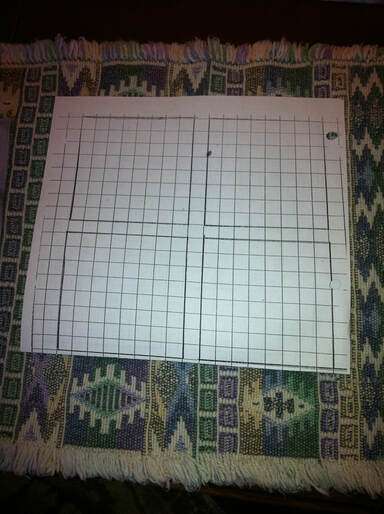
Above you see crudely drawn chess boards. To do this exercise find a sheet of binder paper (8 1/2 x 11) and draw chess boards on both sides. You should be able to have 6 chess boards on both sides, 12 in total. Start your exercise on any square of the board with number one and continue sequentially until you get trapped. (You learn more if you don't erase). The whole point of this exercise is that after you do a minimum of 4 boards you will have done at least 150 knight moves and at the same time you are having fun challenging yourself to do more. Give it a try!